Inevitably, there comes a time when you find yourself needing to capture your screen, whether it’s for demonstrating something, creating tutorials, or seeking tech support. You might wonder, “Can I screen record on my Mac?” The answer is a resounding yes! Your Mac comes equipped with built-in utilities that allow you to screen record effortlessly. But hold on, there’s more to it.
Though these built-in options are handy, they do have some limitations that can get a bit bothersome. Fret not, for there is a plethora of free and paid third-party apps that can sweep away those limitations, giving you the freedom to create the screen recordings you desire.
Let’s delve into the process of screen recording on Mac, unraveling the mysteries and answering any related questions you may have. Ready to embark on this recording adventure? Let’s get started!
Capturing System Audio – A Must-Know Skill
Perhaps you want to include some narration or capture your computer’s audio as part of your screen recording. If so, we’ve got you covered! We’ll outline the ways to record both system and external audio in each method below.
Ending Your Recording Session – As Easy as ABC
Just as there are various ways to initiate screen recording on Mac, there are also diverse methods to put an end to your recording. To address this, we’ll guide you on how to stop recording in each of the methods we discuss.
Method 1: Screenshot Utility – Your Trusty Ally
First up, your Mac already has a built-in screenshot utility that saves you tons of trouble. This helpful tool allows you to take screenshots of your entire screen, cropped portions, or even copy them to your clipboard for easy pasting.
But did you know that this utility can also facilitate screen recording on Mac? That’s right! No additional installations required for a straightforward recording.
To learn how, follow these steps, and remember the magical shortcut “cmd + shift + 5”:
1. Summon the screen capture bar by pressing “cmd + shift + 5.”
2. Customize your recording options using the buttons on the bar.
3. Set a timer, choose where to save your recording, and select your microphone if you want to include your voice.
4. You’re all set! Click “Record” to start capturing your screen.
If you want to record system audio using the Screenshot Utility, alas, it’s not native. You can grab the free “Soundflower” and follow a tutorial to get it working.
To stop your recording, simply click the stop icon on the top menu bar, or utilize the shortcut “cmd + ctrl + esc.”
Why Screenshot Utility Rocks!
Using the built-in Screenshot Utility is a brilliant idea since it’s the easiest and most accessible method to record your screen on various Mac models.
Method 2: QuickTime Player – A Versatile Player and Recorder
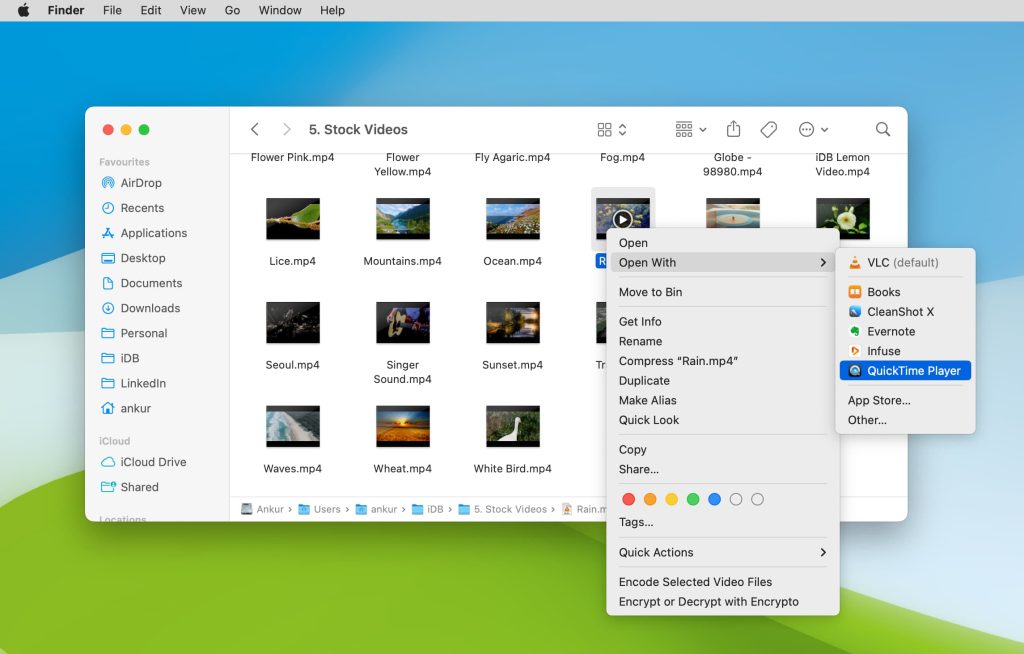
Next on the list is the trusty QuickTime Player, well-known for its media player capabilities. However, you might be surprised to find out that it can also record your screen when needed. Here’s how you do it:
1. Open QuickTime Player by accessing it via Launchpad or using the Spotlight search.
2. Head to “File” > “New Screen Recording” from the top menu bar.
3. Utilize the screen recording options to set up your preferences.
4. Click “Start Recording” to commence your screen capture.
As for recording system audio using QuickTime, again, it’s not natively supported. You can employ “Soundflower” along with a tutorial to get it functioning.
To stop recording in QuickTime, click the stop icon on the top menu bar or use the shortcut “cmd + ctrl + esc.”
Why Choose QuickTime Player?
QuickTime Player is a cost-free and user-friendly option that likely comes pre-installed on your Mac. It offers a hassle-free recording experience with slightly more control than the Screenshot Utility.
Method 3: OBS Studio – The Ultimate Flexibility
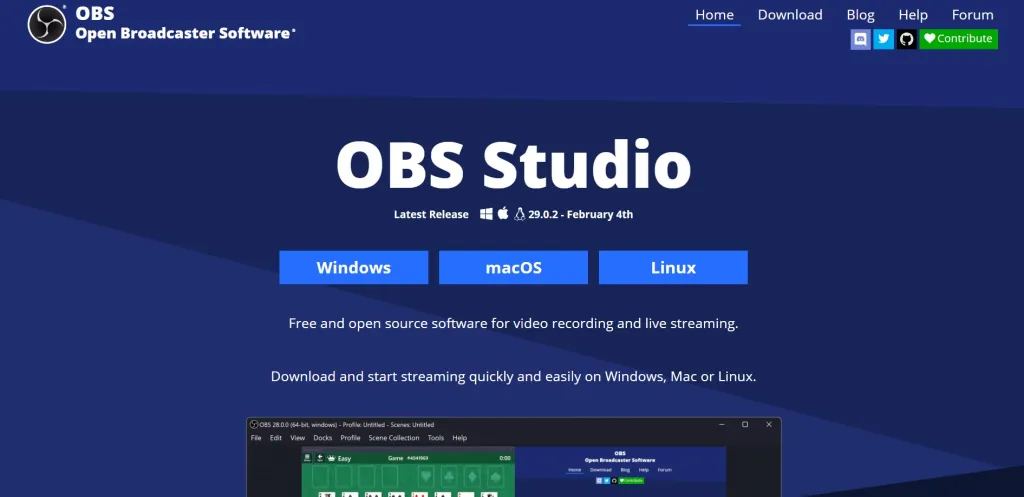
If you’re seeking a comprehensive solution for screen recording, streaming, and capturing system audio and your microphone simultaneously, OBS Studio is the way to go! This versatile software is favored by streamers, podcasters, and content creators alike.
Let’s see how you can make a macOS screen recording with OBS Studio:
1. Download and install OBS Studio and open it up.
2. Use the “Sources” panel at the bottom to capture your screen.
3. Click on the “+” icon and choose “Display Capture.”
4. Fine-tune your display capture to fit your OBS canvas if needed.
5. Hit “Start Recording” and proceed with your content.
To record system audio on OBS Studio, create an “Audio Input Capture” source and select your microphone from the dropdown menu. For capturing system audio, you’ll need a third-party app like “Soundflower.”
To stop recording in OBS Studio, simply click “Stop Recording.”
What Makes OBS Studio Stand Out?
OBS Studio grants you unmatched flexibility. Its capabilities extend to screen recording, streaming, and adding various sources to enhance your recordings. Abundant tutorials online make it relatively easy to master.
Other Third-Party Gems
Apart from the built-in utilities and OBS Studio, you might also explore some third-party tools like “Loom” and “CleanShot X” for different recording experiences.
Frequently Asked Questions
If you find yourself wondering where your screen recordings go on Mac, remember that the location varies depending on the method you use. Typically, the built-in screenshot/recording utility saves files to your desktop, but you can change the saving location using “cmd + shift + 5” and options.
Yes, you can record your screen on Mac for free using the built-in utilities or free third-party apps like OBS Studio, Streamlabs Desktop, and Loom.
Recording audio alongside your screen is now more convenient than ever. The methods explained in this guide each have their own way of capturing internal or external audio. Check out the details above to learn how to record audio using your chosen method.
In Conclusion
Gone are the days when special software was necessary for screen recording. Thanks to built-in utilities and third-party apps, creating screen recordings on your Mac is now a breeze. No matter which Mac model you own, whether it’s a MacBook Air, Pro, or an iMac, the methods discussed above will work wonders!
We hope this comprehensive guide on how to screen record on Mac has empowered you to create your recordings with confidence. Do you have a favorite method? Share your thoughts in the comments below!
P.S. Need to record a phone call on your iPhone? Check out our guide on how to do just that!