
Owing to the interconnectedness facilitated by smartphones, you are always a call or a text away for anyone in your contact list. From social media mentions to notifications about your online orders, your phone ensures you are constantly in the loop.
This perpetual connectivity, though beneficial in some aspects, can be distracting and disruptive, especially while you are working or seeking some downtime. The standard silent mode might mute calls and alerts, but the sight of your phone lighting up can still lure you in.
To address this, Apple introduced the clever “Do Not Disturb” (DND) feature on its iPhones. This feature, once activated, keeps your phone quiet and its screen dark while still receiving notifications. It’s a handy tool for those looking to focus, rest, or take a hiatus from the digital realm.
Let’s learn how to make use of the “Do Not Disturb” feature on iPhones.
Activating the Do Not Disturb Feature on Your iPhone Manually
Debuting in 2012 with iOS 6, the DND feature has evolved over time with Apple incorporating additional functionalities. You can enable it manually or set a schedule for automatic activation. The below steps are for manual activation using an iOS 15 or later device.
Utilizing iOS 15 or Later
This way allows you quick access to the DND settings, turning them on or off as needed. This proves beneficial when you’re at a cinema or have irregular working hours.
The following steps illustrate how to enable “Do Not Disturb” from your iPhone’s Control Center, accessed by swiping down from the top right corner of your screen:
1. Tap the moon icon, located on the left above the flashlight and timer buttons, to activate “Do Not Disturb.”
2. Tapping the moon icon highlights it, confirming that “Do Not Disturb” is active.
To disable “Do Not Disturb,” you can retrace these steps, toggle off the switch, or tap the moon icon again.
An alternative method involves tapping the “Focus” option instead of the moon icon. Here’s how:
1. Select “Focus.”
2. You’ll then be presented with four different options, with “Do Not Disturb” at the top.
3. Select “Do Not Disturb” to enable it.
4. Returning to the lock screen will show a “Do Not Disturb” notification at the bottom.
Using iOS 14.8 and Earlier
For those who’ve stuck with iOS 14.8 or older versions, enabling the DND feature is still feasible. Here’s how:
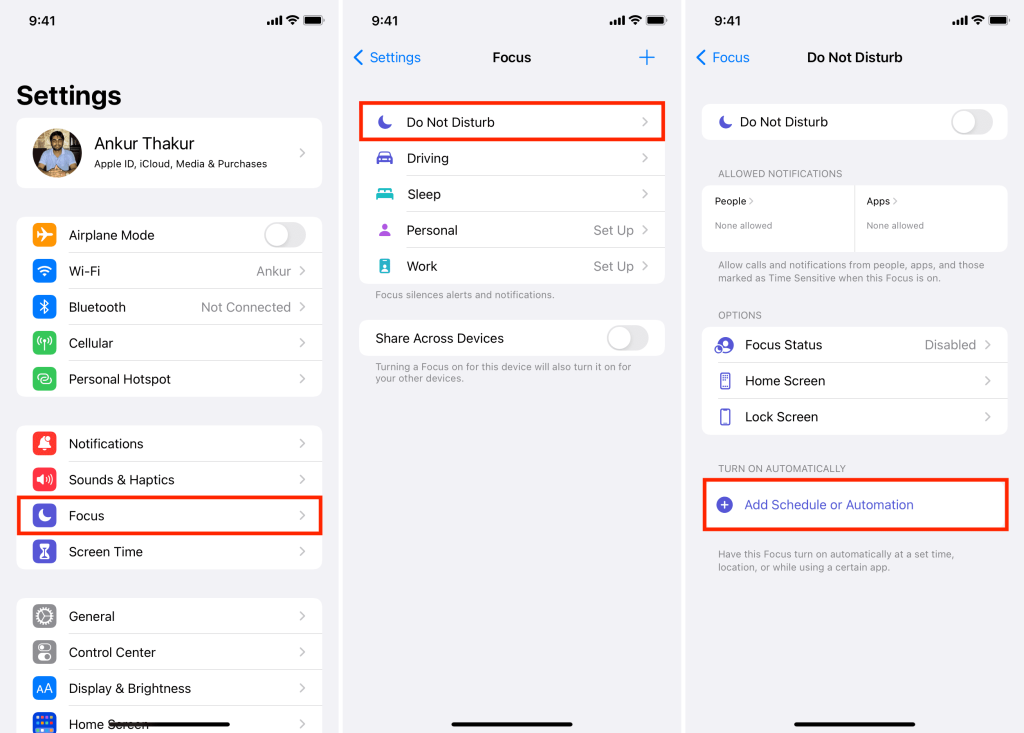
1. Open “Settings” from your home screen.
2. Scroll to the “Do Not Disturb” option and tap it. You’ll see a toggle button on its right.
3. If the toggle button is gray, DND is turned off. Tapping it will turn it on and it will become green.
Scheduling the Do Not Disturb Feature
Enabling DND manually every night before sleep or during work hours can be tiresome. There’s also a chance that you might forget to turn it on sometimes, resulting in disrupted sleep or work.
Luckily, Apple introduced an automatic scheduling function for your convenience. Follow these steps to use this function:
With iOS 15 or Later
If you’re running iOS 15 or a newer version, do the following:
1. Swipe down from the upper right corner to open the Control Center.
2. Tap on “Focus”. Ensure you tap on the text, not the circular symbol next to it.
3. To the right of the “Do Not Disturb” button are three dots leading to the DND settings.
4. Tapping the three dots prompts you to select from two options:
Enable DND for 1 hour
Use DND until the next morning
5. If neither of these options suits you, you can customize your settings.
6. Tap on “Settings,” scroll down, and select “Set a Schedule.”
7. Toggle the switch on.
8. Define the time frame for DND by editing the “From” and “To” times under the “Schedule” option.
9. The days of the week are listed below. Select the days when you want to deactivate DND.
10. After customizing your DND schedule, hit “Back” in the upper left corner to review your updated schedule.
Using iOS 14.8 and Earlier
For older iOS versions, follow these steps to set a DND schedule:
1. Open Settings on your iPhone.
2. Tap on “Do Not Disturb.”
3. Scroll to “Scheduled” and turn on the toggle.
4. Set the start and end times for automatic DND activation.
5. Following these steps, your iPhone’s DND will be automatically active during the defined time every day.
Personalizing the Do Not Disturb Feature
Apart from activation, deactivation, and scheduling, you can further customize your DND settings.
Here’s how to personalize your DND settings from the Control Center:
1. Swipe down from the top right corner of your screen and tap “Focus.”
2. Tap the three-dot icon to the right of the “Do Not Disturb” option.
3. Select “Settings.”
4. If you want to customize which contacts can reach you during DND, go to the “People” section to customize notifications.
5. Click “Add” to include contacts for whom you wish to disable notifications.
6. The default setting in this section is “Allow Notifications From.”
7. The “Allow Calls From” option lets you specify who can message you – everyone, your favorites, contacts, or allowed people.
8. Tap “Back” at the top right corner.
9. Here, you can also modify app preferences by selecting “Apps” on the right of the “People” option. The default setting is “Allow Notifications From.”
10. Tap “Add Apps” to include the apps you want on your exception list.
11. Go back to the DND settings and scroll down to the “Customize Screens” section to choose one of two options.
12. Return to the DND settings page and scroll to the “Focus Filters” section at the bottom.
13. Click “Add Filter” to customize app behaviors during DND.
Frequently Asked Questions
Do Not Disturb vs. Focus: What’s Different?
You may have noticed the “Focus” feature is only present in iOS 15 or later, unlike iOS 14.8, which only offers the “Do Not Disturb” option. So, what separates the two?
The older DND feature silences notifications and prevents the screen from illuminating. However, iOS 15 enhanced this by introducing “Focus.”
Under this, you have an improved “Do Not Disturb” option and three additional “Focus” settings: Personal, Work, and Sleep. Thus, “Focus” encompasses the previous “Do Not Disturb” feature.
Final Thoughts
To strike a healthy equilibrium between relaxation, productivity, and digital interaction, knowing how to use the “Do Not Disturb” iPhone feature is crucial. This feature empowers you to determine which calls, messages, or apps can penetrate your serenity.
This guide aims to help you adapt the DND settings to your specific needs or preferences. For more guidance on other iPhone features, check out these beneficial iPhone courses covering topics like using Whatsapp, enhancing photography skills, and more!