The credibility of your data plays a pivotal role when conducting computations. Google Sheets’ data validation tool acts as a safeguard, ensuring that the data you input adheres to specific standards. This prevents your computations from becoming pointless.
Employing Google Sheets’ validation techniques introduces gentle constraints on data input, paving the way for uniformity and accuracy across all collaborators.
Neglecting data validation might result in a spreadsheet riddled with errors, rendering it a chaotic jumble. Collaborative projects intensify this problem since it’s not just your own possible lapses you need to be wary of, but also the potential missteps of others, some of whom might not be diligent.
There’s a variety of Google Sheets validation methods available to ensure only designated values can be entered, including:
– Checkboxes
– Date selection tools
– Cell verifications
– Dropdown menus
– Restrictions based on types of values (like dates, numbers, text, monetary figures, etc.)
Delve deeper into this guide to comprehend the intricacies of implementing data validation in Google Sheets. Enhance your proficiency and shield your spreadsheets from bothersome errors.
Beginning Your Journey with Google Sheets Data Validation

To access the data validation feature in Google Sheets, simply follow:
Data > Data validation
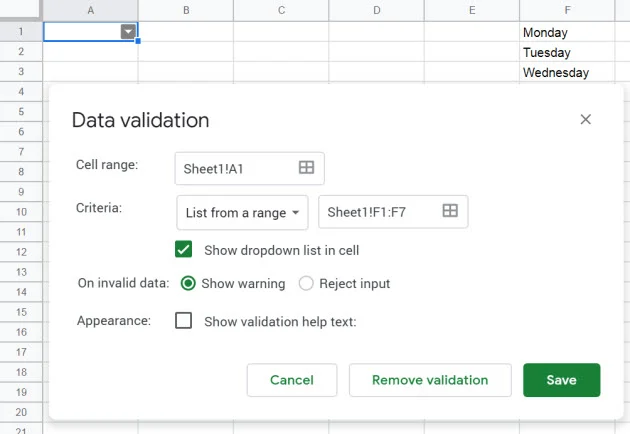
This action brings forth a dialogue box teeming with options to set and apply to your desired cell range.
Here’s a breakdown of these options:
– Cell range: Represents the cells you’ve chosen before accessing the validation menu, ensuring they’re free of discrepancies. You can also manually input them.
– Data validation: Refers to the way you want your data vetted. A dropdown presents seven distinct options, each implying a unique validation requisite for your chosen cell range.
– On invalid data: This dictates Google Sheets’ response upon encountering unsuitable data. Two choices emerge:
– Show Warning: Inputs are accepted, but hovering over the cell reveals an alert about its invalidity.
– Reject input: Blocks the input outright, revealing a prompt stating its rejection — an excellent tool for stopping erroneous entries from the get-go.
– Appearance: Tailor the alert sent when the spreadsheet detects unfitting data. This only works when ‘Reject input’ is enabled.
How to Remove Data Validation in Google Sheets

Eliminating data validation from your Google Sheet is a breeze:
1. Head over to Data > Data validation
2. Fill in the validation details you intend to discard in the emerging menu (last set validation for the cell range will appear by default).
3. Click ‘Remove validation’.
Example Insights
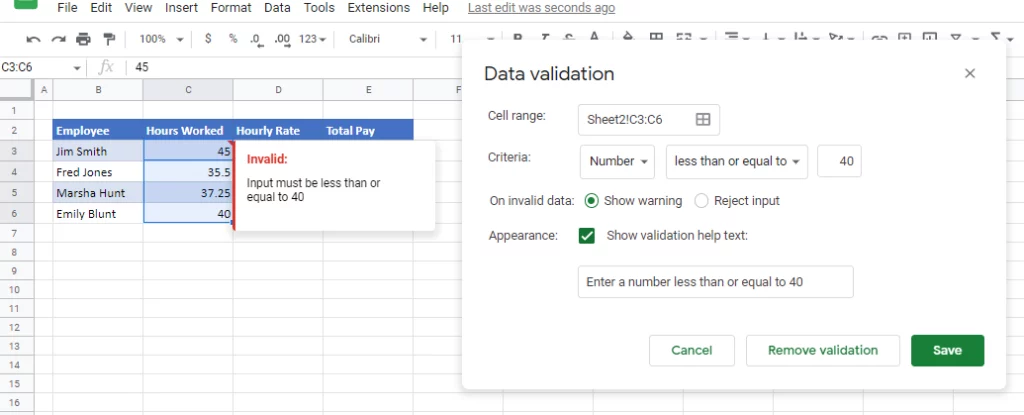
1. Elementary Conditional Data Validation in Google Sheets: A straightforward validation in Google Sheets involves permitting only specific numbers within a set of cells. Dive into the process:
– Launch the Data validation menu.
– In the Criteria dropdown, pick ‘number’.
– Define the number range for permitted inputs.
– Opt for ‘Show warning’ or ‘Reject input’.
– If ‘Reject input’ is your choice, toggle on ‘Show validation help text’ and draft a guiding message.
2. Crafting a Custom Formula for Data Validation in Google Sheets: Consider a scenario where manual input is necessary instead of the SUM function. A custom formula in Google Sheets can help validate accuracy. Here’s how:
– Identify the initial cell for the custom formula.
– Journey to Data > Data validation.
– In the Criteria dropdown, search for ‘Custom formula is’.
– For illustration, the formula could be: =F5=D5+E5.
– Confirm with ‘Save’.
– Drag the cell’s blue box to extend the validation, adjusting for adjacent columns.
Google Sheets Data Validation FAQs

For those skimming to this FAQ segment, here’s a concise answer to some common queries:
How to Implement Data Validation in Google Sheets?
– Mark the cells for validation.
– Traverse to Data > Data validation.
– Determine your preferred data validation method.
How to Activate Conditional Data Validation?
Once set, Google Sheets automatically enforces your chosen conditional formatting. Just follow the aforementioned steps to implement them.
What Defines a Validation Rule?
It’s essentially a set criterion in Google Sheets that either warns or obstructs inappropriate entries.
Applying Data Validation Across Multiple Sheets:
Sadly, a blanket application across sheets necessitates a Google Script. It’s generally simpler to handle each sheet individually.
Filtering Data Validation in Google Sheets:
Employ the FILTER function ahead of your data validation or utilize the Named ranges option prior to entering the Data validation menu.
In Conclusion
This guide elucidated the workings of Google Sheets data validation in the clearest manner. While custom formulas can indeed become intricate, grasping the foundational validation concepts is crucial. Should uncertainties arise, feel free to voice them in the comments.
