
Apps specifically designed for managing tasks can be incredibly useful, but they’re not always the best fit. Perhaps you’re collaborating on a project with others and need to distribute the list, or maybe you’d like to physically print out the list and stick it on your refrigerator.
By constructing a task list on Google Sheets, you have the ability to customize it according to your requirements, and you can share it, print it, or access it on any device. We’re about to walk you through the process of creating a task list in Google Sheets, whether you’re using a template provided by Google, a template from a third party, or creating one from the ground up.
Using a Template to Build a Task List in Google Sheets
Google Sheets provides numerous free templates for users, offering a quick and easy solution for creating a checklist, complete with due dates, descriptions of tasks, and checkboxes for completed tasks.
Initiating the Template
Start by logging into your Google account and navigating to Google Sheets.
- If recent templates appear on your main page for Google Sheets, go ahead and select the “Template Gallery” at the top. If not, find the plus (+) symbol in the bottom-right corner, hover over it, and select “Choose Template.”
- Navigate to the “Personal” category and pick the “To-do list” template.
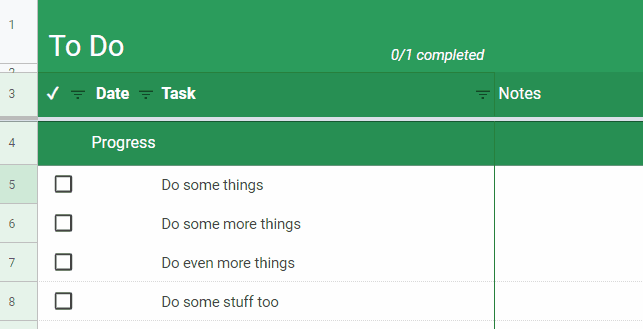
- Upon opening the template, you’ll see sample data, which includes instructions on how to use the template.
- If you wish, you can alter the name of the template by clicking on “To-do list” at the top left and typing in your preferred name. If not, dive straight into using the template.
Inputting Your Tasks and Deadlines
You may wish to start off by eliminating the sample tasks and dates and unchecking the boxes, giving you a blank slate to start with.
In the “Task” column, you can input the name or a detailed description of a task.
On the left, you have the option of entering a due date in the “Date” column using a common date format (e.g., May 1, 2023; 5/1/23). The template will automatically adjust the date to a M/D format like 5/1.
Filter or Sort by Completion, Date, or Task
Your task list can be filtered or sorted using any of the columns. Click the “Filter” icon next to the column header and sort either alphabetically, by date, or by color.
Select the “Filter” icon and choose by color, condition, value, or an individual item at the bottom.
Marking Tasks as Done
When a task is completed, tick the box in column A. The text will then be crossed out and the row will be shaded in gray.
As you go through the list, the number of completed tasks and the total will be displayed at the top.
Implementing a Third-Party To-Do List Template
You might be intrigued by the concept of using a task list template, but would prefer one that includes sections for task statuses or prioritization. This free task list template from Vertex42 could be the perfect solution.
It includes sections for tasks, statuses, priorities, due dates, PICK options, owners, and notes.
Download and Duplicate the Template
- On the Vertex42 website, you’ll find this template at the top of the list of task list options. Select “Google Sheets” on the right.
Next, select “Get the Template.” - Sign in to your Google account. You’ll then be shown a preview of the template. Select “Use Template” in the top-right corner.
- The template is in “View only” mode, so we recommend creating a personal copy of the template.
Select “File” > “Make a copy,” give your copied file a name, choose a Google Drive folder (if desired), and click “Make a copy.”
Your personal copy of the template will open in a new tab, ready for use.
Input Your Tasks and Details
Start off by adding your tasks in the “Project/Task” column. Use the columns on the right for any additional details.
Status: Use the drop-down list in the “Status” column to track the progress of each task.
Priority: Assign a high, medium, or low priority for each task.
Due Date: Input a due date in a common format. The template will automatically convert it to the MM/DD/YYYY format.
PICK: If you wish, you can assign a PICK option to each task.
Owner: For a shared task list, input the responsible party in the “Owner” column.
Notes: Add any additional details or items.
Customize Status, Priority, and PICK Lists
You can customize the items in the Status, Priority, and PICK lists to suit your personal needs:
- Go to the “Lists” tab at the bottom.
- You’ll see the items that are currently included in each of the lists. You can add, edit, or delete these items to make them more suitable for your project or task management style.
- Whenever you make a change, it will automatically be reflected in the corresponding list once you go back to the “ToDoList” tab.
For instance, you can remove the “Pending Approval” and “Pending Review” items by simply deleting the text.
When we go back to the task list, the “Status” list has been updated to reflect that change.
Be Mindful of Template Conditional Formatting
In addition to the customization of the lists mentioned above, this template comes with conditional formatting that can help you quickly identify items:
Priority: The text will turn red for “High” priority and blue for “Low” priority.
Due Date: Past due dates will appear in red text.
PICK: The text will turn green for Easy/High Value, and red for Hard/Low Value.
For a versatile task list template — featuring bonus features that simplify task management — this Vertex42 template is an excellent choice.
Crafting a Google Sheets Task List from Scratch
If you prefer to create and personalize your own task list in Google Sheets, you can certainly construct one from scratch. You can design a list that uses whatever elements you require or desire. Continue reading to learn how to use:
- Checkboxes for completed tasks
- Drop-down lists for task statuses
- Conditional formatting for overdue items
- Open a Fresh Workbook and Input the Basics
Navigate to Google Sheets and sign in if needed.
On the main page of Google Sheets, either select “Blank” in the template section or hover over the plus (+) sign (on the bottom-right corner) and select “Create new spreadsheet.”
Give your task list a name in the “Untitled spreadsheet” field in the top-left corner.
You can name it something like “My Task List,” “Our Project Tasks,” or anything that suits your needs. You can also format the title using the font and the fill section of the toolbar.
Input a column header for each item you want on your list. For this example, we’ll include columns for Complete, Task, Date, and Status. Again, these headings can be in bold or any color you prefer.
Insert Checkboxes for Finished Tasks
Add checkboxes in the “Complete” column to easily mark tasks as finished.
Select the first cell where you want a checkbox, open the “Insert” menu, and select “Checkbox.”
Click the fill handle, which is found at the bottom-right corner of the cell containing the checkbox. Drag down to fill the remaining cells.
For more options, check out our guide to inserting checkboxes in Google Sheets.