We may earn a commission if you purchase an item via one of the links on this page. Commissions have no effect on our editorial content. Read the entire disclosure.
Do you have a tiny garden that isn’t big enough for your tomatoes? What if you have a problem with maintaining a large garden?
I understand that feeling completely!
That’s why we’ve compiled a guide on how to grow vertically using tomato cages and trellis. These trellis designs aren’t only stunning, they’re also fully functional.
Now, doesn’t that sound like the perfect concoction?
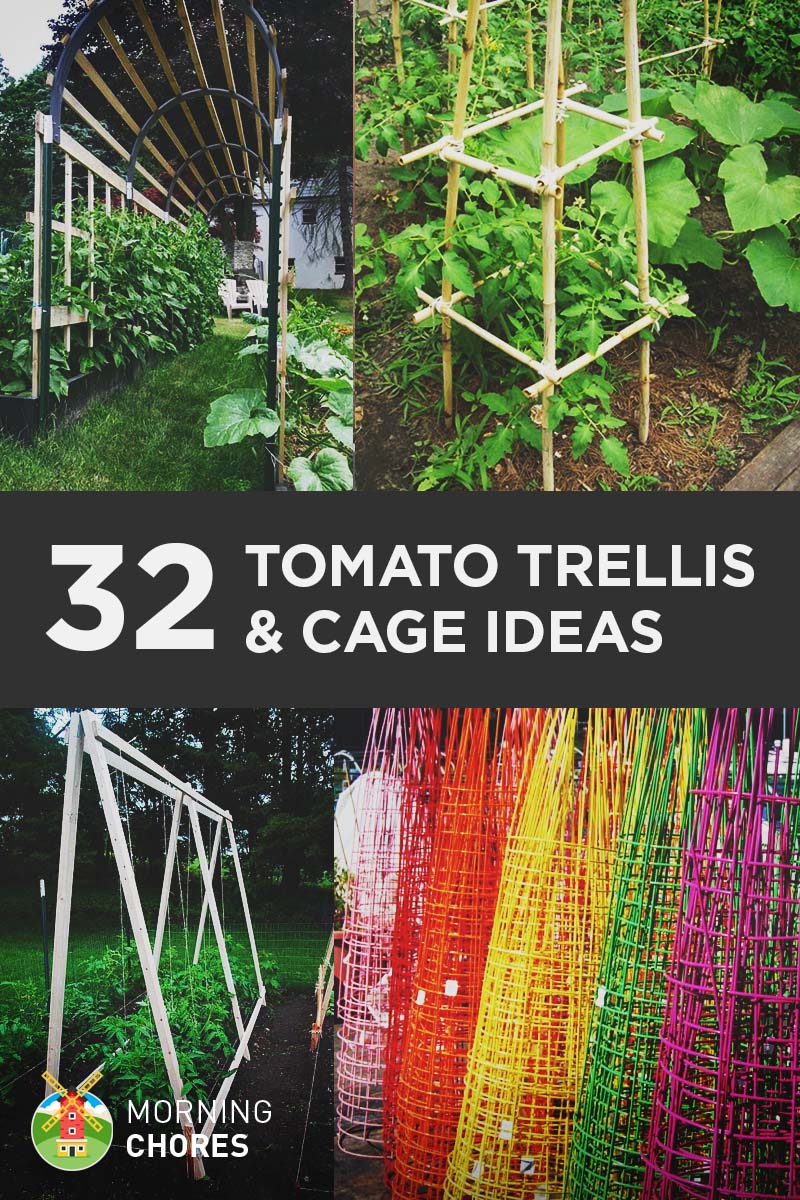
1. The Trellis Raised Bed Combo

This trellis idea is the epitome of elegant simplicity.
In reality, you just need to create two tiny above-ground beds. You’ll then need to construct a wire trellis connecting the two beds once they’re in position. It will create an archway out of it.
If you cultivate green beans, squash, pumpkins, or any other vine-related crops, you’ll have a completely covered archway in no time.
It’ll give your yard that wacky look.
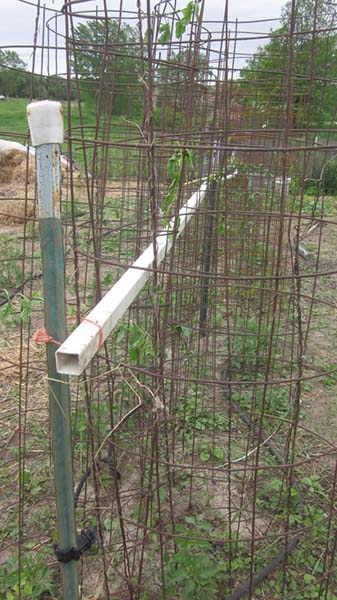
2. The T-Post Tomato Trellis

This tomato trellis design is rustic and homemade, yet it is fully functional. It scream-out ‘HOMESTEAD!
So, this lady drove t-posts into the ground while constructing her tomato trellis. She used twine after using rebar.
The t-posts are inserted into the ground, the rebar is stretched across the top, and twine is ran up and down the frame. Tie the twine around the tomato plant’s base. Your homemade trellis will be overrun by the tomato plant when it develops.
This allows you to grow tomatoes with a straight, strong stem. Meanwhile, it takes the pressure off of you by staking all of your tomato plants.
If you have a garden like I do, you’ll end up with a lot of tomato plants.
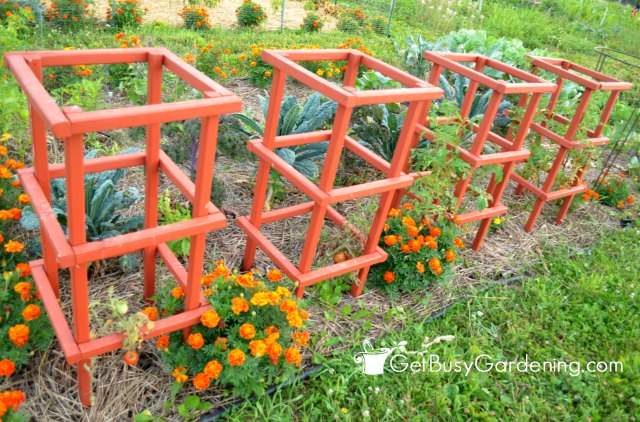
3. The Wooden Tomato Cage
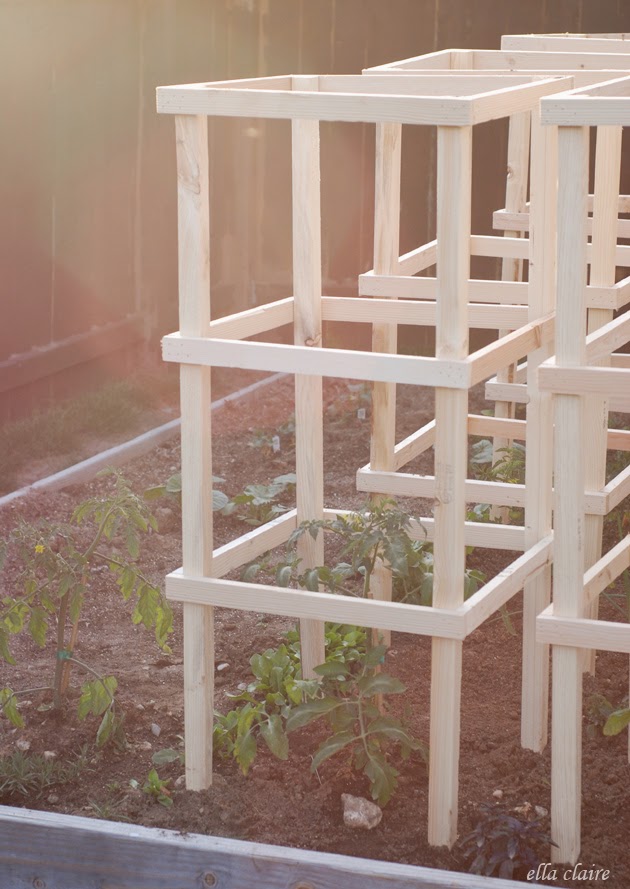
I love this tomato cage!
Since it is simple, easy to build, and seems to be quite cost-effective, the reason for this is. That’s everything I look for in a homestead project.
Here is how this tomato cage can come to life for you:
2x2x8 and 1x2x8 boards are required. Next, you’ll cut the boards into various dimensions using these saws. You’ll need to screw or nail the wood together once you get the various dimensions cut.
You’re constructing a sturdy and tall wooden box for your tomatoes to grow in.
The fact that it is sturdy is the best part. Isn’t it awful when your tomatoes grow so huge and gorgeous near the conclusion of summer, only to have their support give way on them?
So, about this tomato cage, it’s great. Your full-figured tomato plants will not be able to grow next to it.
4. The Lean-To Tomato Trellis

This is yet another example of a tomato trellis with ingenuity written all over it. The post-drive authors plant their posts into the ground.
Sounds pretty easy so far, right?
They also utilize livestock paneling after that. The livestock paneling is placed on the opposite side of the bed after the posts are put on one side of the bed.
They simply let the cattle paneling lean over the bed and rest on the posts once that is in place. This will allow your livestock paneling to support any plants that you cultivate in the bed (which it requires).
I also like the fact that it is durable and simple to store when not in use.
Yet, another fantastic way to expand your plants is by allowing them room to roam.
5. The Garden Obelisk
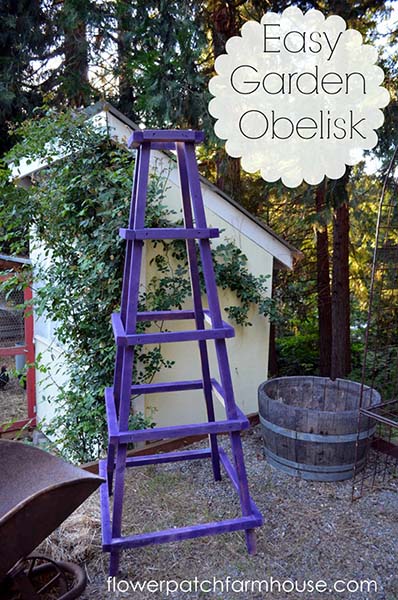
You may be curious about what an obelisk is for anyone of you who are like me and have deep rural roots (I couldn’t use the phrase ya’ll back there).
It sounds kind of fancy, right?
So, I’ll have to say that it sounds more sophisticated than anything I use at home. But, let me digress a bit here: It’s a snazzy term for a trellis that looks like a lighthouse.
Since no angles need to be cut anywhere, this obelisk is particularly well-known for its simplicity. All you have to do is make a 4-sided ladder by cutting wood into various lengths (which she provides in the post).
If you have your heart set on an obelisk, this isn’t the simplest trellis I’ve discussed, but it may be the plan you’ve been waiting for.
6. The Upside Down Tomato Cage

The dream of growing your tomatoes upside down began with the introduction of the Topsy-Turvy Upside Down Tomato Planter years ago.
“Gee, I believe I’ll grow my tomatoes upside down today,” most individuals had never considered.
They do, however, now. This is what it’s all about.
There are several options for purchasing a planter to grow tomatoes upside down. This is a fantastic technique to grow tomatoes upside down if you want to do it yourself.
It’s incredible to watch this individual change 5-gallon buckets into upside-down planters. The tomato will run out of a tiny hole in the bottom that they drill first. After that, they drill holes in the chord to support the bucket as it enters.
Next, they put a newspaper in the bucket and add soil to it. This is when things get really interesting.
They made a little hole in the newspaper right before planting the tomato plant so that it may grow through it and reach the outside of the bucket.
Until the tomato plant reaches a more advanced stage of development, they utilize the newspaper to hold it in place.
This is a fantastic notion. When I built my own hanging tomato planter, you can see how I did it if you want to try it yourself.
7. The Homemade Trellis

This trellis is a little hard to see through all of the pictures of this post. So allow me to fill you in.
They’re constructing a fence around a garden. Because their garden looks similar to Fort Knox, I assume they have huge creatures where they live.
They realize they have a bumper crop of pumpkins in the midst of this project, as I was saying.
When you have pumpkins that appear on their own, what do you do?
Of course, you construct a trellis!
They used wooden stakes and metal fencing to construct this little trellis. This crop will be led to the roof, where it will have an old metal gate ceiling, using wooden stakes.
Are you aware of what may happen here?
The pumpkins will have a garden ceiling filled with dangling pumpkins once they mature up the trellis and latch on to the gates.
That sounds pretty neat to me.
8. The Bailing Twine Tomato Bed
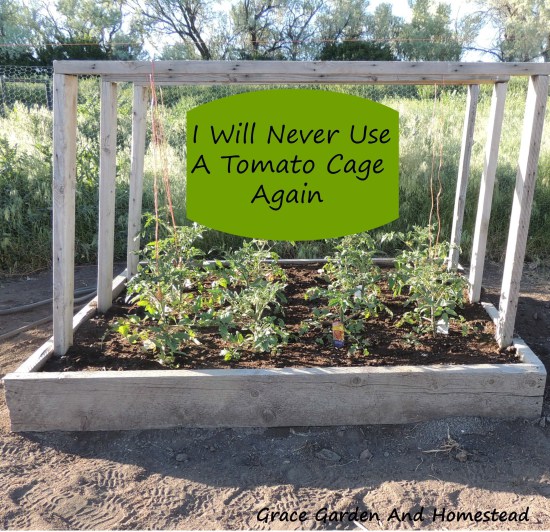
This would be the tomato cage of my dreams if I grew a smaller amount of tomatoes!
Unfortunately, I produce a lot of tomatoes, so I don’t believe I could cover everything we do with them. Do me a favor if you aren’t a tomato addict (like myself) and instead produce a typical tomato harvest?
Build it for me, please! Post your photos so I may vicariously live through your tomato plants and I may see how wonderful it turned out.
So now that I’ve gone on, how did she build this fantastic trellis/tomato bed? Isn’t it a bit intriguing?
So, allow me to tell you about it. She just constructed an above-ground bed garden. It doesn’t have to be an above-ground bed, she says.
She places two short poles in the ground and then a lengthy beam that links the two poles once she’s finished building the bed.
After that, she simply uses a top beam to drape bailing twine down to her tomato plants. This allows the plants to climb right up the twine.
It looks very organized, and I’m in love with it.
9. The Wire Method Trellis
Training your tomatoes to stand straight and tall is a very inexpensive and simple way to do it. All you have to do is drill two metal poles into the ground. Isn’t it a breeze to do that?
You run one metal pole across the top after you place the metal poles in the ground. Then, every 5 feet, add a horizontal line of string.
You clip the vines to the pole with a clothespin, plastic clip, or Velcro when your tomatoes reach the first wire. Every 5 feet, you do this.
The only issue with this style of trellis is that it isn’t strong enough to sustain beefsteak tomatoes. While the author does provide some tips on strengthening it, The sturdier variant is depicted in the photo displayed above.
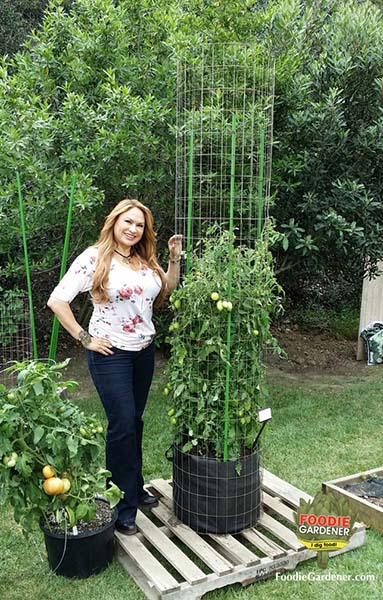
10. The PVC Pipe Tomato Cage
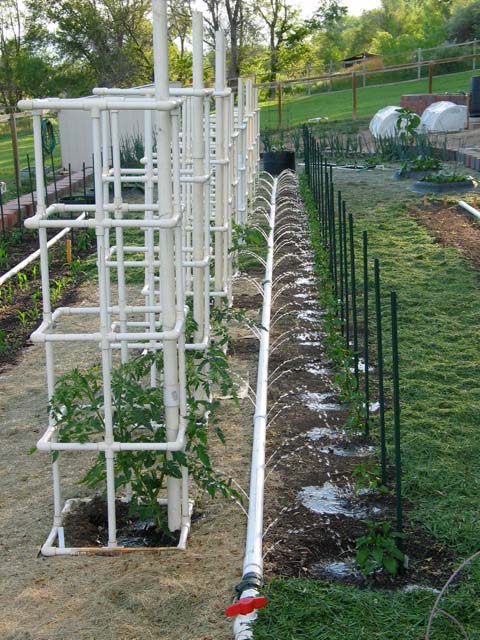
This tomato cage is quite robust. The tomatoes are attached to a large PVC pipe, which you start with.
However, from the bottom of the tomato to the top, tiny PVC pipes are formed into a box shape. This enables the tomatoes to grow freely and strongly supported.
Since it is cost-effective and seems to be durable, I am excited about this idea.
This lady produces monster tomatoes, as the website demonstrates. As a result, they are an excellent choice for any kind of tomato plant.
The concept is basic, and it can be constructed in a few minutes by anybody who is a novice member of the DIY Club.
I give this trellis a positive review.
11. The Bamboo Tomato Cage

I adore this tomato cage! The fact that it is durable, functional, and maybe free is why I choose it.
Who doesn’t like free?
You’re in business if you grow bamboo or know someone who does. If you have room, I encourage you to grow bamboo. Animals can eat the shoots off of it, making it a fun building material.
In any case, this is a standard box/cage shape that you’ll find. They start by digging four bamboo sticks into the earth. Then, on each side, they inserted two bamboo supports. Because bamboo is a tough material, these are very durable.
During the winter, it’ll be simple to store the cage since you can simply tie it together and then un Tie it again to store it.
Ultimately, this is a great tomato cage.
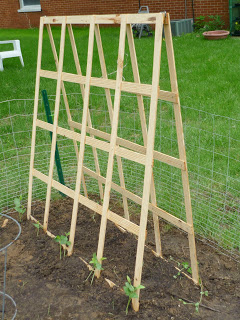
12. The Folding Cage

This is the perfect tomato cage if you need something that will withstand the heat of the summer and store easily through the winter.
It is actually a folding tomato cage. It only takes a few pieces and is something that someone with some experience with construction may create in a jiffy, which is one of the reasons it’s so easy to store.
To construct this cage, you’ll need a variety of wood pieces and screws. You’re building two independent ladder sections that may be folded and unfold together, according to the theory.
And, like with any ladder, you’ll have to construct the side hinges as well.
This is a great option for larger tomato plants because of its unique design and simple materials list. Go ahead and grow those prize-winning beef steaks inside this thing, because wood doesn’t bend as we all know.
13. The DIY Champion Trellis

This is a simple do-it-yourself project. You only need a few different sizes of wood to construct it, and it is the fundamental box design of a trellis.
Thus, you start by driving four stakes into the ground. The four posts will then be joined together with rungs. On the inside of the tomato plant, it will grow large and robust.
Keeping everything square is the only somewhat difficult part of constructing this. You shouldn’t have any trouble with the correct tools.
Don’t forget that you can paint it after you’ve constructed it. Painting your trellis adds personality to your home by giving it a unique character.
I appreciate this sort of trellis because it’s simple to construct and doesn’t require a lot of effort from our side.
14. The Folding Trellis
The folding cage is not to be confused with this one. This isn’t a cage, it’s a habitat. Instead, it is a trellis. The folding cage is closed on all sides, whereas this one is not. The primary distinction between the two is that.
Instead, it’s constructed of slats rather than being constructed from thicker wood. You’ll also need a staple gun and hinges.
The outside square of one side of the trellis will be built first. To create a checkered pattern, you’ll need to run the wooden slats vertical and then horizontal after that.
Next, repeat the procedures on the opposite side of the trellis. After that, you simply attach hinges between the two sides and you’re good to go.
I like this option because it is both innovative and reversible when not in use.
15. The Colorful Cages
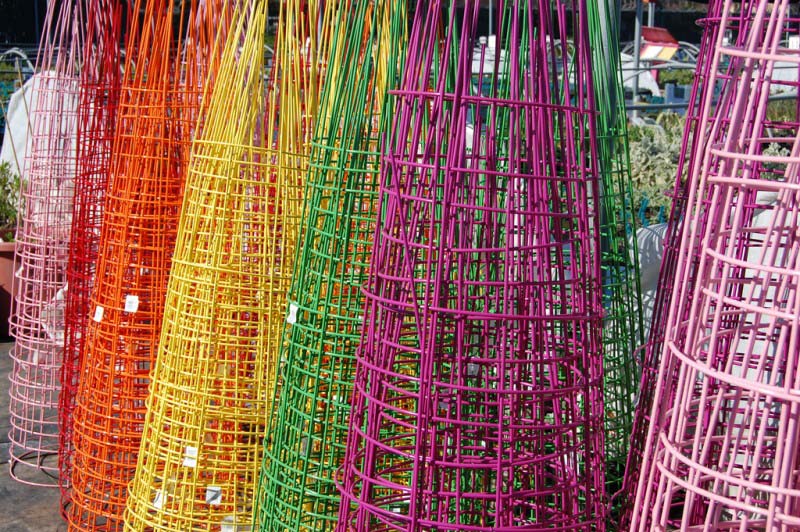
Wire cages have a horrible reputation on most of these jobs. They say they aren’t durable or don’t stand up, which makes people uncomfortable.
The fact that they are so cheap and customizable goes unnoticed by everyone. Take, for example, this spin.
Maybe this year you want a tomato cage, but you don’t have the time or money to complete some of the other tasks.
That’s fine. Go ahead and buy the wire kind, if you want. After that, you can add your own personality to it with minimal effort and expense.
Spray painting your wire tomato cages gives them a unique look. Paint each a distinct hue if you want some extra color in your garden.
Pick out a fantastic classic color and paint them all in uniform if you want to add a bit of vintage appeal to your garden.
There are no limitations to what may be done here. It’s a good day to paint happy faces. Here’s to a nice summer!
16. The Sturdy Wooden Tomato Cage
This tomato cage was created by someone that got so frustrated with the flimsy quality of the wire cages.
Now, as I mentioned, if you want to make a small investment and buy the wire cage that is totally up to you.
However, if you are want to grow large beefsteak tomatoes year after year, it might be a wise investment to make a cage similar to this one.
They began creating this wooden tomato cage like a lot of the others we have already looked at. They used 4 posts and then connected the sides with rungs of wood.
After doing this, they placed them in the ground and tied the tomato to parts of the cage to train it to grow.
However, these people took it one step further (which I love). They painted their tomato cage.
Not only is it sturdy, but they also used it to add a splash of character to their garden.
17. The $10 Obelisk
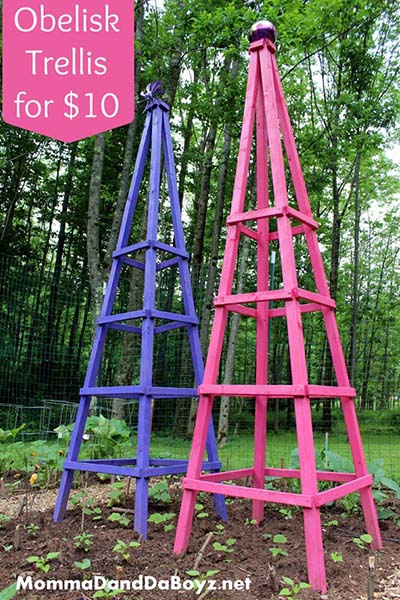
Another obelisk can be found here. I’d like to begin by saying that if you’re growing pole beans, this might be a good choice.
Your tomatoes or beans will have plenty of room to grow because this obelisk is so tall and sturdy.
How do you make an obelisk that we now know what it’s good for?
In fact, it’s almost identical to the others in terms of detail. You’ll need to purchase your wood. She includes a size chart with the materials she recommends. This makes constructing this obelisk much simpler for the novice of DIYers because of this extremely useful list. She discusses a variety of wood choices.
For example, if you own a table saw and aren’t sure how to use it, here is how you might get the lumber for less.
You’ll build two sides of a ladder after you’ve chosen between the wood types and gotten your wood ready to go. To create a square appearance, add ladder rungs to the exterior.
It will then begin to develop a lighthouse-like appearance as it grows taller. By painting her obelisks in various hues, she adds a bit of personality to her garden.
18. The 3-Step Trellis

This is a simple yet stunning project for your garden. This trellis is great for growing practically anything.
There are three simple steps to creating the trellis. That’s incredible, isn’t it?
We’ll start by determining the size of the trellis you’d want. So you know what to buy for the following stages, the author provides a detailed materials list.
You’ll construct two teepees with four lengths of wood that you’ll utilize as the primary structural support after you’ve measured the area.
You’ll tie the teepees up at the top once you’ve put them in place.
After that, you’ll start tying the trellis to the horizontal pieces. It couldn’t be much simpler than that.
Drilling and hammering are not used. Just organize everything the way you want.
19. The Arch Walkway Trellis

This is a truly beautiful creation! It is simply stunning.
So now that I’ve discovered yet another wonderful creation that I wish I could fit into my gardening area, let’s discuss how you may have it in your yard.
You start by constructing two container boxes. They should be near enough to each other that you may form an arch between them.
The arch walkway must be constructed after you have erected your boxes. Metal poles or PVC pipe may be used to accomplish this, as we did previously with the green bean archway.
Next, you’ll build wood panels that run up the side of the archway, and then use lengthier pieces of wood to cover the top.
You’ll have a fully covered archway when you’re finished with the construction and the tomatoes are full. That provides your vegetables a fantastic environment to thrive in and creates a stunning setting in your own garden.
20. Upcycling Trellis Ideas
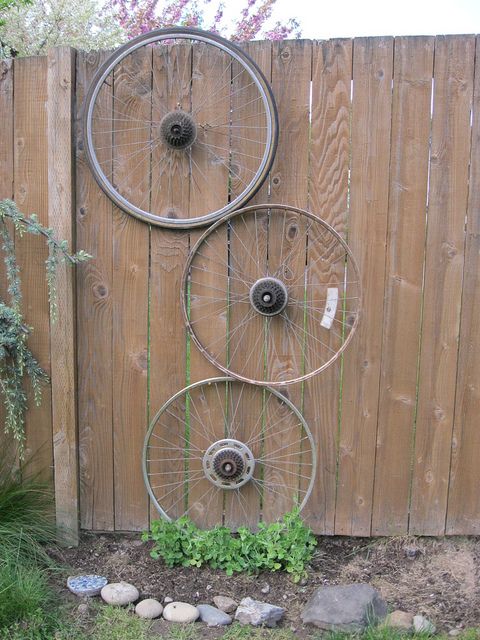
This one allows you to recycle old stuff you may have around the house and employ it to encourage your plants flourish in a variety of ways.
She starts by demonstrating how to use an old chair as a trellis, with the bottom removed. It seems to be quite lovely.
She then hangs old motorcycle tires on the fence and moves on to that. Plants that run faster than bushes would benefit from this.
After that, she put up a vertical planting of plants that run on an old coat rack. That’s a great notion.
Crib railings are then placed vertically in the ground to follow up. Plants that prefer to run may have the room to do so with this.
My favorites are the last three. She trains the plants to grow on it by using an old door, a ladder, or an old mirror frame with a string running across it.
They all have a sort of classic, period feel that is really appealing. This is one method to create a garden with personality if you want it.
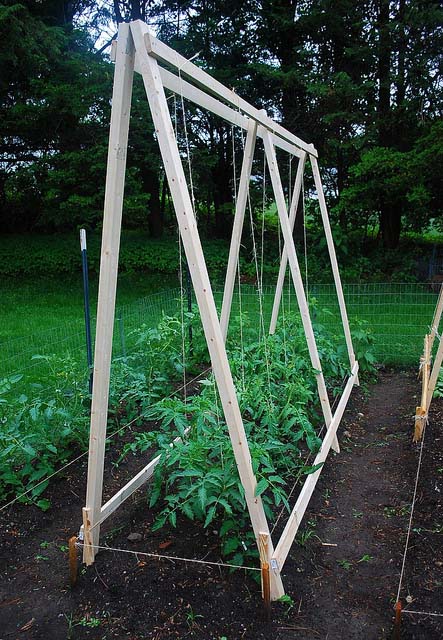
21. The ‘Ultimate’ Tomato Trellis

This may be the whopper tomato trellis you were searching for if you want to prevent your plants from drooping.
The A-frame swing set design is used to build this trellis. That’s what it made me think of.
They used four pieces of wood placed in the earth on either side to construct this tomato trellis. The letter ‘A’ was formed by combining two pieces.
After that, they built a couple of beams over top and bottom.
Ultimately, to teach the tomatoes to develop on it, they ran a wire from the highest beam to the lowest beam.
I’m going to take it a step further and introduce a little individuality. If you’ve got an old swing set, go for it! You’ll be able to avoid building the A-frame.
You could actually use the frame without taking the swings off. After that, you simply have to connect the bottom beam and run the cable.
If not, this appears to be a fairly straightforward system to construct, and it would certainly help you keep your tomatoes upright.
22. The Grow Box

A container bed is designed with this tomato trellis. It also seems to be rather straightforward to build.
Place four wooden posts in the bed to get started. One is located in each corner.
You’ll need to construct or purchase a wooden slat trellis after they’re in place. Each pole will get a layer of trellis attached to it.
After that, you’ll attach the 4 posts to the second layer of wooden trellis. As many layers as you think your plants will need, you may add.
There’s nothing more to say about this one.
I believe it would be ideal for individuals who are growing in a limited area, and it would certainly suffice for keeping your tomato plants up.
23. The Folding Cage #2

There are several styles of excellent tomato cages available on this site. Most of them have already been discussed in this article.
They do, however, provide a superb solution for a folding tomato cage. It’s a lot like the folding cage I described before, except it’s larger.
You start by creating two sides of a ladder and then 3 rungs on each side. You’ll then need to strengthen your cage by adding braces on the side. They then advise adding debris wood at the summit to secure it.
I like these instructions because they not only give you a materials list, but also offer a cost estimate and detailed step-by-step instructions for the whole project.
This cage is rather simple to construct, and it’s also quick. That’s a positive thing, as it usually denotes simplicity.
24. The Livestock Cage

This is a really creative notion. You already have everything you need to build these cages if you have extra livestock paneling surrounding your homestead.
On a flat surface, they begin by laying out the livestock paneling. For this step, he suggests installing a driveway, although it’s up to you where you do it.
He then reduces the livestock paneling to fit. After that, he bends a piece of wood to form the livestock paneling where he needs to bend it in order to shape it.
He then makes a square by bending and configuring the paneling.
He then places it on the ground after that. That seems fairly straightforward, doesn’t it?
If you utilize it to manage big animals, the great feature about this tomato cage is that it can hold your massive, meaty tomatoes.
25. The Concrete Mesh Tomato Cage

It seems that building a tomato cage is quite straightforward. They begin by informing you that you’ll need a list of just a few items.
Because of the materials you’re working with, I noticed that you’ll need work gloves and sharp cutters.
You’ll roll out the concrete mesh once all of your materials are laid out. In order to keep it down, you’ll need to construct a milk crate with a cinderblock in it.
After that, you’ll cut the cement mesh to your desired size.
You’ll roll it up and toss it near your tomatoes once you’re done with that.
That’s all there is to it, really.
26. The Tomato Tower
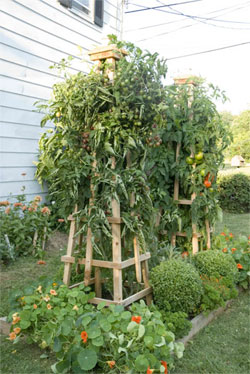
This is another obelisk, if you were wondering. I like how this word, which seemed so strange at first, has become an antiquated term.
I’m digressing, but like with the other obelisks you construct, you build this one. Because you’ll have a tomato tower, this one just seems to look so good.
No more stooping over to retrieve those tomatoes. With this masterpiece, you’ll think you’re selecting fruit off a tree.
As a result, you start with four posts. You build a box by adding rungs all the way around.
It will expand upwards in shape after taking on the appearance of a lighthouse. After that, it’ll be a tiny light source in the middle of your yard.
27. The Stake A Tomato Cage

This is the simplest tomato trellis/cage you’ll ever see. There are no bones about it, as far as I can tell.
In a jam, this concept came to mind. A means of tying up her tomato plants was required by the author.
She started investigating what she had and boom, the tomato cage appeared. Isn’t that how most inventive homesteading plans come about?
So you can cut the precise dimensions of welded wire fencing. They use an ancient stake as a starting point.
You can make your own tomato cage by attaching fencing to stakes on either side of the garden.
It’s simple to make and does a terrific job of it. Her photos may tell you what kind of job she had.
Because of the simplicity of construction and durability, I love this tomato cage concept. Your tomatoes aren’t going anywhere if it uses wire fencing.
28. The One And Only
This is the only tomato cage you’ll ever need, according to the author of this particular post. However, it isn’t particularly attractive now that I’ve read the materials list.
To build this tomato cage, you’ll need to use concrete wire mesh. She places t-posts at the ends of each bed as she plants her tomato seedlings.
She puts wire cages made of concrete mesh over her baby seedlings after putting in the t-posts. She then passes the homemade wire cages through a PVC pipe.
This provides a lot of assistance and prevents her cages from collapsing.
Her tomato plants seem to be more like trees in her photos, so she needs a lot of assistance.
I don’t believe any homesteader would have a problem with their tomatoes not standing tall if this cage is shown to be holding her tomato ‘trees’ up.
29. 11 Tomato Staking Technique

While it teaches you about tomato trellis and cages, this article also teaches you how to make them and the advantages and disadvantages.
Cages covered in wire mesh or concrete wire mesh are the first types to be discussed. After that, it covers additional strategies, such as the post and twine technique.
The cost of constructing each is included in this article, which is really amazing. If you’re trying to construct a trellis or tomato cage and you’re looking for the cheapest way to do it, this page should be able to assist you.
It even allows you to purchase items rather than build them. Texas Giant tomato cages are one of the available options.
He tells you what they cost and how much they can withstand. They are only briefly accessible, according to the only disadvantage.
This article might be quite helpful for anybody out there who’s trying to figure out what to do about staking their tomatoes this year.
30. Recycled Pallets Turned Tomato Trellis

Building a tomato trellis is another simple and free project. I’m a big fan of free, so let’s figure out how to build this masterpiece.
You’ll start by collecting pallets from the past. You’ll need to deconstruct them once you get them.
After that, you’ll need to build A-frames on both sides of the garden bed. You’ll take some of the slats and run them horizontally between the frames after your A-frames are built.
In order to train the tomatoes to grow up the trellis, you’ll need to tie them up.
And, for the sake of argument, I’d like to point out how easy it is to maintain this trellis. Although it appears to be rustic, it is actually very functional and should last a long time.
31. The Funky Garden Tomato Trellis
I find this garden idea to be quite brilliant. I’m all about making any home, big or small, more interesting. They have a good chance of doing it.
You start by salvaging old pallets that have been discarded. Don’t be concerned, you’ll be bringing these precious little guys back to life soon.
By keeping the part with slats available, you’ll be able to deconstruct the pallets. For the time being, the remaining half of the pallet can be put on hold.
Next, create an a-frame over the tomatoes by tying together two flat pallet sides.
To train the tomatoes where to grow, you’ll need to tie them to the pallets. What she did to develop the character, though, is what makes her so cool.
She uses a wide range of vivid colors in her work. It’s quite appealing, to say the least. If you can make time, go for it! I know homesteaders who don’t have the opportunity to do all of the creative things we’d want.
32. The Tomato Tower #2
This is a fantastic tomato cage for anyone who grows tomatoes in a pot. A fabric bag, metal posts, and wire fencing will all be required to get started.
Place the tomato in the grow bag what you’re going to do. You’ll wrap the wire fencing around the bag once you’ve placed the grow bag in place. It’s critical to point out that your fencing should be at least 6 feet tall.
After that, you’ll need to install two metal posts on the wire fencing’s opposing sides. This will help to support everything.
For those with a large garden or those who plant their tomatoes in the ground, I don’t see this as a good solution.
This is a fantastic option for you if you’re someone who just wants to put a few tomatoes in a pot in the backyard or if you’re an urban or apartment homesteader.